

The recommended approach to peptide stability testing combines forced-degradation studies with validated, stability-indicating analytics and ICH-aligned accelerated and long-term conditions. Primary monitoring relies on RP-HPLC and LC-MS/MAM for degradant detection, peptide mapping for site identification, and SEC for aggregates. Before generating data, pick your matrix, qualify a stability-indicating method, and lock in your sampling timepoints and batch count.
TL;DR:
- Peptide degradation risk is higher for sequences with Asn-Gly or Asn-Ser motifs, methionine or cysteine residues, and N-terminal glutamines, requiring targeted monitoring.
- Accelerated stability studies should follow ICH standards, with at least three batches tested at 40°C and 75% RH over six months, and long-term testing at 25°C over 12 to 60 months.
- Forced-degradation tests must include thermal, pH, oxidative, and light stress conditions, with mass balance validation and confirmation of degradant identity via chromatography or mass spectrometry.
- For plasma or serum stability, using organic solvent precipitation and avoiding adsorption are crucial, while protease inhibitors help distinguish enzymatic cleavage from chemical degradation.
- Employing at least two orthogonal analytical methods, such as RP-HPLC and LC-MS, is essential to accurately detect and characterize degradation pathways and support justified acceptance limits.
Table of Contents
- Key Degradation Mechanisms and Sequence Risk Factors
- Regulatory Study-Design Essentials for Shelf-Life Data
- Forced-Degradation Study Design: Conditions and Interpretation
- Sample Preparation Across Plasma, Serum, Supernatant, and Buffer
- Choosing Between RP-HPLC, LC-MS, Peptide Mapping, and SEC
- Setting Acceptance Criteria and Interpreting Degradation Kinetics
- Protocol Templates and a Troubleshooting Checklist
- How Well-Documented Reference Material Supports Stability Testing
- Where Peptide Stability Testing Is Headed
- Where Research-Grade Reference Peptides Fit Into Your Workflow
- FAQ
- Sources
Key Degradation Mechanisms and Sequence Risk Factors
Peptides fail in two broad ways: chemical modification of the backbone or side chains, and physical changes to the molecule’s shape and solubility. Knowing which pathway threatens a given sequence lets you choose the right analytical panel before you waste time on the wrong assay.
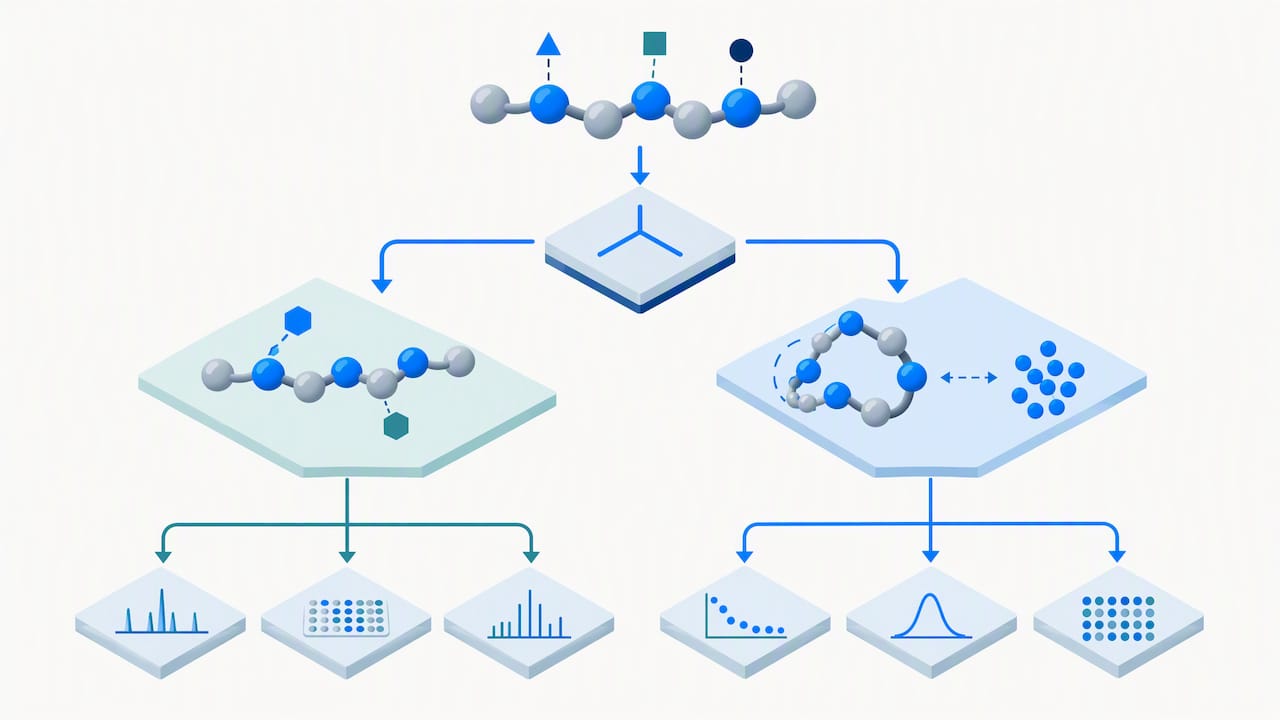
Chemical degradation includes deamidation of asparagine and glutamine residues, oxidation at methionine, cysteine, or tryptophan, hydrolysis of the peptide backbone, racemization of chiral centers, and pyroglutamate formation at N-terminal glutamine or glutamic acid. Physical degradation covers aggregation, adsorption to glass or plastic surfaces, and precipitation, all of which can reduce recoverable concentration without any covalent change at all.
Sequence context predicts much of this risk:
- Asn-Gly or Asn-Ser motifs are classic deamidation hotspots and deserve close monitoring during early formulation work.
- Methionine and cysteine residues flag oxidative risk, particularly in formulations exposed to dissolved oxygen or light.
- Proline-rich regions and N-terminal glutamine residues raise the likelihood of pyroglutamate formation during storage.
- Low solubility sequences or high peptide concentrations increase aggregation risk, especially near the isoelectric point.
- Formulation pH and ionic strength shift which pathway dominates: acidic conditions favor hydrolysis, while near-neutral to alkaline conditions tend to accelerate deamidation.
Each pathway leaves a distinct analytical fingerprint. Deamidation and oxidation typically show up as mass shifts of +1 Da or +16 Da on LC-MS, paired with a shift in RP-HPLC retention time as the modified species elutes earlier or later than the parent peak. Aggregation shows up as new high-molecular-weight signals on SEC or as increased light scattering, while hydrolysis fragments appear as smaller mass species with their own distinct retention behavior. Racemization is harder to catch with standard reversed-phase methods and generally requires chiral chromatography or specialized derivatization.
Predictive screening based on physicochemical properties, including isoelectric point, hydrophobicity, and the presence of known liability residues, can reduce the number of empirical degradation cycles needed before you commit to a full study design. Batch-to-batch inconsistency remains a recurring challenge in peptide manufacturing, which is part of why sequence-based risk flagging earns its place early in a stability program rather than being left as an afterthought.
One consistent finding across stability literature: sequences containing Asn-Gly motifs or multiple methionine residues show measurably faster degradation under accelerated conditions than sequences without these liabilities, which is why a sequence audit belongs at the start of any stability protocol, not after the first failed batch.
Regulatory Study-Design Essentials for Shelf-Life Data
Generating stability data that will hold up under regulatory review means following established study-design parameters rather than improvising conditions. ICH Q1A(R2) sets the baseline: accelerated testing runs at 40°C ± 2°C and 75% ± 5% relative humidity for 6 months, while long-term testing runs at 25°C ± 2°C and 60% ± 5% relative humidity for 12 to 60 months. An intermediate condition is added when accelerated data shows a significant change, giving a middle data point between the two extremes.
Study design also depends on batch count and timing:
- Use a minimum of three primary batches, manufactured by a representative process, to support a proposed shelf-life or retest period.
- Test accelerated samples at 0, 3, and 6 months, and long-term samples at 0, 3, 6, and 12 months, continuing as needed until the proposed shelf-life is covered.
- Apply bracketing or matrixing designs when multiple strengths or container sizes are involved, with the design and its justification documented before testing begins.
- Extend or reduce testing frequency based on observed variability. tighter sampling is warranted when early data show trends.
For biotechnological and biological products, including most synthetic peptides intended for later clinical development, FDA guidance under Q5C expects potency assays and appropriate physicochemical or biochemical methods to be built into the stability program, not bolted on afterward. The guidance also recommends orthogonal analytical approaches so that a single method’s blind spot does not become the whole program’s blind spot, and it calls for reporting degradation products with justified acceptance limits drawn from the batch history itself rather than an arbitrary number.
These conditions, drawn directly from ICH Q1A(R2), apply to new drug substances and products broadly, and peptide-specific programs layer additional orthogonal testing on top of this base structure rather than replacing it. The testing frequency and batch minimums exist precisely because a single batch, or a single timepoint, cannot reveal whether degradation follows a predictable trend or an erratic one, and regulators weigh the latter far more heavily when assessing shelf-life claims.
Forced-Degradation Study Design: Conditions and Interpretation
Forced-degradation, or stress testing, pushes a peptide hard enough to generate degradants on a lab timescale, which then lets you confirm that your analytical method can actually see those degradants when they show up at normal storage rates. Skipping this step means your “stability-indicating” method is really just an assumption.
A workable stress protocol covers four stress types in parallel:
- Thermal stress: incubate aliquots at stepped temperatures, commonly 50°C, 60°C, 70°C, and 80°C, for short defined periods (hours rather than weeks) to generate a degradation curve without destroying the sample outright.
- pH stress: prepare buffered solutions spanning pH 1 to pH 12 and hold samples at each pH for a fixed interval, since hydrolysis and deamidation rates both shift sharply with pH.
- Oxidative stress: expose aliquots to hydrogen peroxide in the 0.1% to 3% range to probe methionine, cysteine, and tryptophan oxidation without overwhelming the sample matrix.
- Photostability: follow ICH Q1B light exposure conditions to assess whether UV or visible light accelerates degradation, particularly relevant for peptides containing tryptophan or tyrosine.
Each stress condition needs a matched control: a frozen or refrigerated control held at a non-stressing temperature, a solvent-only blank to rule out matrix artifacts, and, for biological matrices, enzyme-inhibitor controls to confirm that observed losses reflect chemical degradation rather than residual proteolytic activity in the sample.
Mass balance matters more in stress testing than almost anywhere else in a stability program.
Pro Tip: Run your stress samples alongside a parent-peptide reference standard on the same analytical sequence; co-injection makes it far easier to confirm that a new peak is a genuine degradant and not a column or mobile-phase artifact.
The entire point of forced degradation is to prove your method’s specificity. If your RP-HPLC or LC-MS method cannot separate the stressed sample’s degradants from the parent peak, with clean peak purity and no coelution, that method is not stability-indicating yet, regardless of how well it performs on fresh, undegraded material. Document peak purity assessments and spectral matching results as part of your method validation package, since reviewers will ask for exactly this evidence.
Sample Preparation Across Plasma, Serum, Supernatant, and Buffer
Matrix choice drives nearly every downstream decision in a peptide stability assay, from which precipitation method preserves recovery to which labeling strategy avoids introducing its own artifacts.
For plasma and serum work, protein precipitation method matters more than most researchers initially assume. Comparative protocol work on peptide stability testing in blood plasma and cell culture supernatants found that strong acid precipitation, while effective for many small molecules, is often unsuitable for peptides because it can drive additional degradation during the precipitation step itself. Organic solvent mixtures, typically acetonitrile or methanol-based, preserve peptide integrity better and are the preferred default for plasma and serum matrices unless a specific peptide’s chemistry argues otherwise.
Labeling strategy is the second major choice point. Fluorescent labeling offers higher throughput and easier early-stage screening, but the label itself can alter a peptide’s stability profile, sometimes substantially, by changing its hydrophobicity or steric bulk near a labile bond. Isotopic labeling, paired with LC-MS detection, avoids this label-induced artifact because the isotope adds mass without changing chemistry. A practical two-stage workflow uses fluorescent labels for rapid early screening across many candidate conditions, then confirms the leading candidates with isotope-labeled LC-MS before committing to a full study.
A typical plasma stability incubation looks like this:
- Spike peptide into pooled plasma at a defined concentration, commonly in the low micromolar range depending on assay sensitivity.
- Incubate at 37°C to mimic physiological temperature, with timepoints at 0, 0.5, 1, 2, 4, and 8 hours.
- Stop each timepoint by immediate precipitation with cold organic solvent, which simultaneously halts enzymatic activity and extracts the peptide.
- Centrifuge, collect supernatant, and analyze by LC-MS or RP-HPLC against a calibration curve prepared in the same matrix.
Protease inhibitors deserve a mention of their own. Adding a cocktail of protease inhibitors to plasma or serum samples prior to spiking can distinguish genuine chemical instability from simple enzymatic cleavage, and running both inhibited and non-inhibited arms in parallel clarifies which pathway dominates for a given sequence. For buffer-only stability work, where enzymatic activity is not a factor, the main variables become pH, ionic strength, and temperature, and timepoints can extend much further, often to weeks or months, since the absence of plasma proteases removes the fastest degradation route.
Pro Tip: Keep all precipitation and extraction steps on ice and process samples in small batches; a delay of even 10 to 15 minutes at room temperature between spiking and quenching can introduce enough extra degradation to distort an otherwise clean time course.
Handling choices that seem minor, like which tube material you use, carry real weight. Peptides with hydrophobic stretches can adsorb to standard polypropylene surfaces, silently reducing recovered concentration in a way that looks identical to chemical degradation on a chromatogram. Low-binding tubes or a small percentage of surfactant in the diluent buffer can resolve this, but only if you test for adsorption loss specifically, usually by comparing recovery in a low-binding tube against a standard one at time zero.
Choosing Between RP-HPLC, LC-MS, Peptide Mapping, and SEC
No single analytical method covers every degradation pathway, so a credible stability program pairs at least two orthogonal techniques rather than relying on one assay to catch everything.
RP-HPLC with UV or MS detection remains the workhorse for routine impurity profiling and batch release testing. It separates the parent peptide from related substances based on hydrophobicity, giving a fast, reproducible readout once the method has been validated for specificity, linearity, limit of quantitation and detection, accuracy, precision, and robustness. Its main limitation is that it tells you a peak has changed, not necessarily what chemical modification caused the change, which is where mass spectrometry earns its place.
LC-MS and LC-MS/MS add the molecular detail that RP-HPLC alone cannot provide. A multi-attribute method (MAM) approach, built around LC-MS peptide mapping, allows site-specific identification and quantitation of modifications like deamidation or oxidation within a single assay, replacing what would otherwise require several separate tests. This matters most for peptides with multiple liability sites, where knowing which residue is modified, and by how much, directly affects whether a degradant is a safety concern or a benign variant.
Peptide mapping itself deserves a caution that is easy to overlook: the enzymatic digest used to generate mapping fragments is not inherently stable. Digest samples can degrade further during storage or the wait before injection, and that secondary degradation can mimic the very signal you are trying to measure in the intact peptide. Validating digest stability, meaning confirming that the digest itself does not change over the timeframe between preparation and analysis, belongs in the method validation package alongside the more obvious specificity and linearity checks.
For physical stability, size-exclusion chromatography (SEC) separates monomer from aggregate based on hydrodynamic size, and it pairs well with dynamic light scattering (DLS) or multi-angle light scattering when you need to characterize aggregate size distribution rather than just flagging that aggregation occurred. Potency or bioassays round out the picture by confirming that a chemically intact peptide still performs its intended biological function, which matters because not every chemical modification destroys activity, and not every analytically invisible change leaves function untouched.
A practical method combination looks like this:
- RP-HPLC for routine, high-throughput impurity monitoring across all stability timepoints.
- LC-MS or MAM for periodic deep characterization, particularly at pivotal timepoints or whenever RP-HPLC flags an unidentified peak.
- SEC for aggregate monitoring at every timepoint where physical stability is a concern.
- Bioassay or potency testing at key milestones, especially release and end-of-shelf-life, per the orthogonal-method expectation in Q5C guidance.
Each method’s validation checkpoint should tie back to the forced-degradation data generated earlier: if stress testing produced a deamidated species, your chosen methods need to demonstrably resolve and quantify that species before you trust them on real-time stability samples.
Setting Acceptance Criteria and Interpreting Degradation Kinetics
Turning a stack of chromatograms into a defensible shelf-life claim requires a consistent analytical framework, not just a visual read of whether peaks look stable.
Degradation rate calculations typically start by plotting percent remaining (or percent degradant formed) against time at each storage condition, then fitting a kinetic model, usually zero-order or first-order, to extract a rate constant. Extrapolating from accelerated conditions to predicted shelf-life using the Arrhenius equation is standard practice for small molecules, but peptides warrant real caution here. Guidance on accelerated-to-real-time extrapolation notes that complex degradation chemistry in peptides means accelerated trends do not always translate linearly to real-time behavior, so orthogonal confirmation at intermediate and long-term conditions is the safer path rather than trusting an Arrhenius projection alone.
Alert and action limits should come from your own batch history wherever possible, not from a generic industry number:
- Set an alert limit at a degradant level that flags a trend worth investigating, often based on the variability seen across your primary batches.
- Set an action limit at a level that would trigger a formal investigation and potential batch disposition decision.
- Flag any new, unspecified degradant above the reporting threshold for structural identification, following the orthogonal-method expectations in regulatory guidance.
- Reassess limits whenever a new batch or new manufacturing process is introduced, since historical limits may no longer represent current material.
A recurring theme in regulatory guidance: degradation products should be reported with justified acceptance limits tied to actual batch data, not arbitrary cutoffs, which means your stability program needs enough batch history before you can defend any specification with confidence.
Reporting for CMC or regulatory submissions generally expects a consistent package: batch-by-batch tables of results at each timepoint and condition, impurity or degradant profiles with chromatographic retention times, representative chromatograms for each condition, and mass spectrometry identification data for any degradant above the reporting threshold. Keeping this format consistent across study phases saves significant rework when the data eventually moves into a formal submission.
Protocol Templates and a Troubleshooting Checklist
Having the concepts straight is only half the job. These two protocol skeletons give you a starting point you can adapt to a specific peptide sequence and matrix.
Protocol A: plasma stability with LC-MS readout
- Prepare pooled plasma, pre-warmed to 37°C, and prepare a stock solution of the peptide in a compatible vehicle.
- Spike plasma to the target concentration and immediately pull a time-zero aliquot.
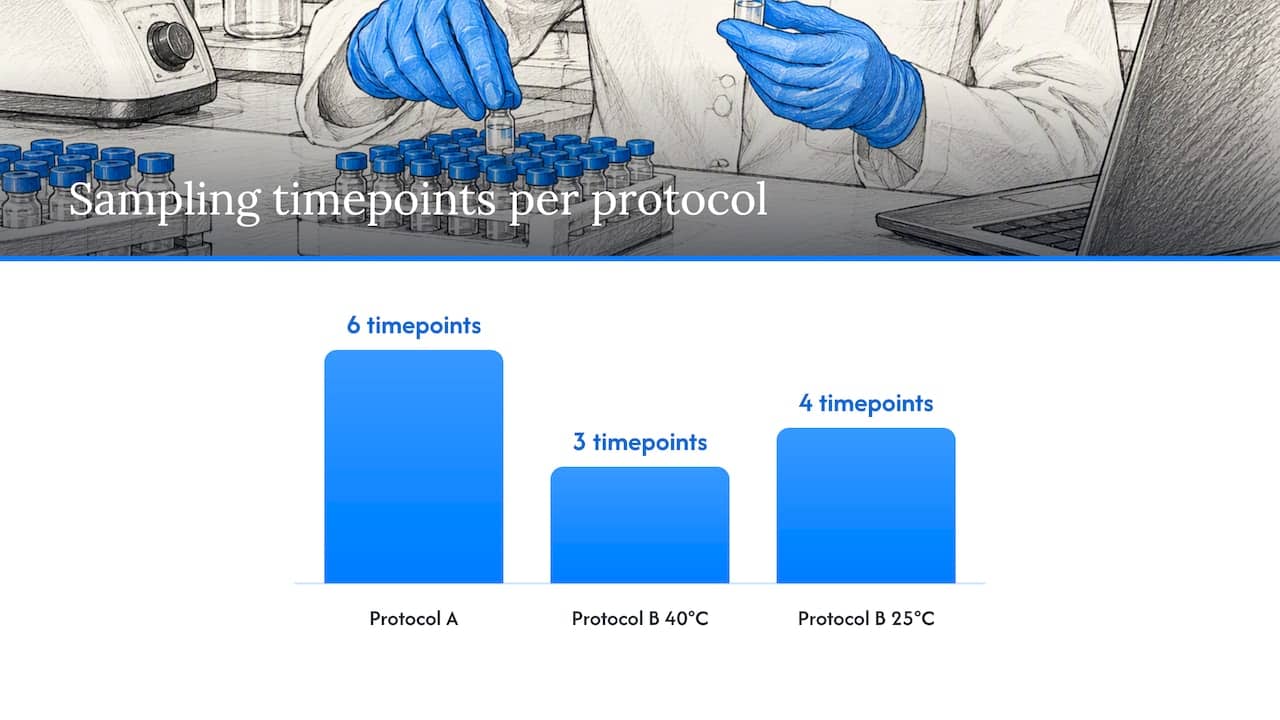
- Incubate the remaining volume at 37°C, pulling aliquots at 0.5, 1, 2, 4, and 8 hours.
- Quench each aliquot immediately with cold acetonitrile or methanol at a 3:1 solvent-to-sample ratio.
- Centrifuge, collect supernatant, and run each timepoint against a matrix-matched calibration curve by LC-MS.
- Include a QC sample at low, mid, and high concentration on every analytical run to confirm assay performance.
Protocol B: accelerated stability of lyophilized peptide
- Store lyophilized vials at 25°C/60% RH and 40°C/75% RH in parallel, per ICH Q1A(R2) conditions.
- Pull vials at 0, 3, and 6 months (40°C arm) and 0, 3, 6, and 12 months (25°C arm).
- Reconstitute each pulled vial under identical conditions and analyze immediately by RP-HPLC for purity and related substances.
- Track residual moisture at each timepoint, since moisture content directly affects lyophilized peptide stability.
- Compare impurity profiles across timepoints to identify any new or growing degradant peaks.
A short troubleshooting reference helps when results do not match expectations:
| Problem | Likely cause | First check |
|---|---|---|
| Low recovery | Surface adsorption or precipitation loss | Switch to low-binding tubes, confirm extraction efficiency |
| Inconsistent replicates | Matrix variability or pipetting error | Pool and re-aliquot matrix, verify spike volumes |
| Unexpected new peak | Genuine degradant or method artifact | Co-inject with reference standard, check blank |
| Digest instability | Enzymatic digest degrading before injection | Validate digest hold time, inject promptly |
Replication matters more than most protocols acknowledge upfront. Running each timepoint in triplicate, across at least two independent spiking preparations, gives you enough statistical power to distinguish a genuine trend from assay noise, and it is far cheaper to build that replication into the original design than to re-run a study after an ambiguous result.
Pro Tip: When a new peak appears only at one timepoint and does not grow over time, check your injection sequence for carryover before assuming you have found a real degradant.
How Well-Documented Reference Material Supports Stability Testing
Stability-indicating method validation moves faster when you start from a well-characterized reference peptide rather than an unknown quantity. At Data Peptides, every lot we sell ships with third-party batch testing results, a Certificate of Analysis, and endotoxin data, giving researchers a documented starting point instead of a blank slate.
Having that documentation in hand when you qualify a stability-indicating method shortens the validation runway considerably: you already know the purity baseline, so any new peak that shows up during forced degradation is clearly attributable to the stress condition rather than to pre-existing impurity. A reliable reference standard also gives your analytical method something stable to calibrate against while you are still working out matrix effects and recovery.
Storage conditions deserve the same rigor in your own freezer as in a formal study. Balancing chemical stability against sterility means avoiding repeated freeze-thaw cycles, keeping lyophilized material desiccated and protected from light, and reconstituting only the volume needed for a given experiment. Our storage temperature guidance covers the trade-offs between solution and lyophilized storage in more detail for researchers setting up their own handling SOPs.
As always, every peptide we offer is intended for laboratory research use only, not for human or animal consumption, and nothing here substitutes for medical or clinical guidance.
Where Peptide Stability Testing Is Headed
Multi-attribute LC-MS methods are quietly replacing the old habit of running five separate assays to check five separate quality attributes. Once a lab invests in a MAM workflow, adding a new liability site to monitor is a method parameter change, not a new assay to validate from scratch, and that shift in effort allocation is going to keep pushing adoption forward even in smaller research groups.
In-silico prediction of sequence liabilities deserves more attention than it currently gets outside large pharmaceutical organizations, as detailed on the comprehensive USA Research Peptide Reference & Guide. Flagging a deamidation hotspot or an oxidation-prone residue before you run a single stress study saves real time, and the technology is accurate enough now that skipping it looks increasingly like leaving information on the table.
Automated, continuously monitored stability storage is still mostly a late-stage development tool, but the economics are shifting as the hardware gets cheaper. Expect it to show up earlier in development pipelines over the next few years, not because the science changed, but because the cost of entry finally did.
— Data Peptides
Where Research-Grade Reference Peptides Fit Into Your Workflow
Building a stability program from scratch is slower when your starting material has no documented purity baseline. We supply lab-grade peptides with third-party batch testing, full Certificates of Analysis, and endotoxin data for every lot, so a known reference point is sitting in your freezer before your study design is even finalized.
What that documentation gives you in practice:
- A purity baseline on day one, which shortens method validation since new peaks during stress testing are clearly attributable to the stress condition.
- Endotoxin data included with every lot, relevant for any biological-matrix work.
- Storage guidance to help you set up handling SOPs that protect chemical stability without compromising sterility.
- Direct access to a current peptide product catalog for researchers who need documented reference material for a new program.
Our research applications overview outlines the current catalog and the documentation that ships with it, organized by research category.
FAQ
How long can BPC 157 stay unrefrigerated?
Stability outside refrigeration depends heavily on formulation, concentration, and ambient temperature, and no single duration applies across all storage scenarios. As a general handling principle for peptides, limiting room-temperature exposure and returning material to proper cold storage as quickly as practical reduces degradation risk, and specific duration claims should be confirmed against the documentation provided with a given lot.
How long do peptides stay stable?
Stability duration varies by sequence, formulation, and storage condition, which is exactly why ICH-aligned long-term studies run from 12 to 60 months under controlled temperature and humidity. Lyophilized peptides generally hold up longer than reconstituted solutions, and proper cold storage with minimal freeze-thaw cycling extends usable stability in either form.
Do peptides really go bad after 30 days?
There is no universal 30-day expiration rule for peptides; degradation timing depends on the specific sequence, its formulation, and how it has been stored. A peptide reconstituted in solution and left at room temperature will typically degrade faster than one kept lyophilized and properly refrigerated or frozen, which is why stability-indicating assays, not a fixed calendar date, are the reliable way to assess actual condition.
How do I test if my peptides are real?
Confirming peptide identity and purity requires analytical testing, typically RP-HPLC for purity profiling and mass spectrometry for molecular weight and sequence confirmation, rather than visual inspection alone. A Certificate of Analysis from a third-party laboratory, which reports purity percentage and identity confirmation for a specific lot, is the standard documentation researchers should expect and verify before using any reference material in a study.